Adding Controls to Fields in Sage X3
Sage X3 is packed with things you don’t know it can do; one of the things that users often don’t take advantage of is the capacity to modify the software without knowing how to code.
Just to name a few:
- Entry transactions allow you to choose which fields you want to see on a screen without touching the development area of the system.
- Conditional formatting allows you to color code your fields based on conditions.
- Workflows allow you to be alerted when something happens in the system based on your own business rules.
Another feature of Sage X3 that is often overlooked is the ability to add controls to a given field in the system without the need to know the 4GL language, which is Sage X3’s proprietary coding language.
Here’s how to add controls to fields in Sage X3:
Under the setup module, you can find a function called control tables.
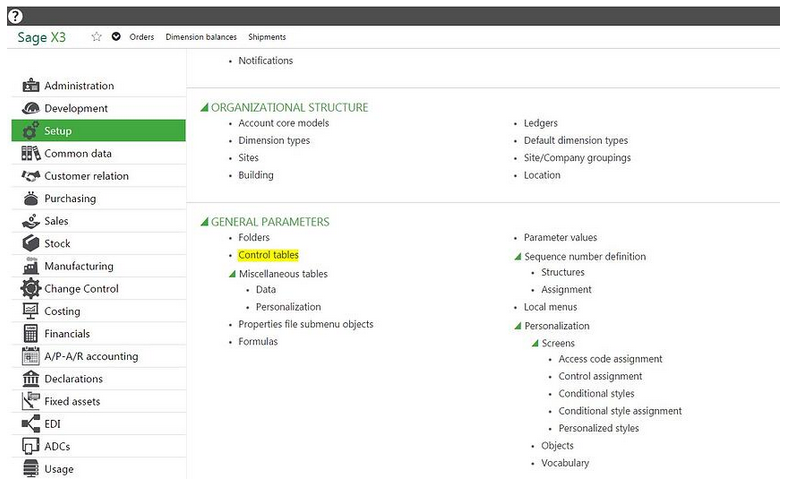
Developers eventually realized that they were constantly adding custom logic to standard or custom fields using the control action, so they decided to offer a function where a user could simply add controls to a field through an easy-to-use interface.
You can add any control to any field on a screen. Be aware, however, that sometimes the standard logic will take over after your control is evaluated and it might be overriding your configuration. This particularly holds true for controls you would add to a standard field.
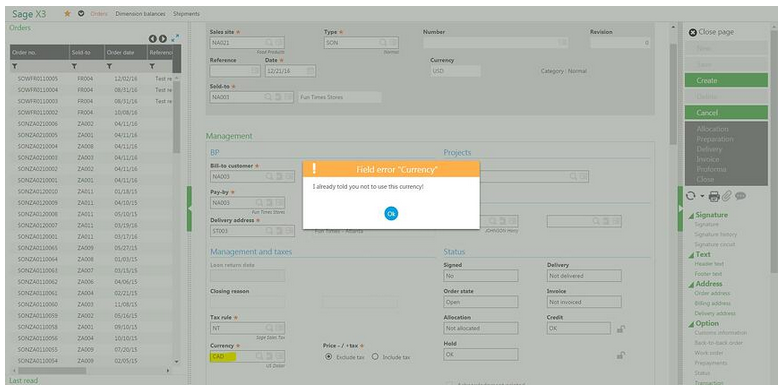
For example: you might want to add a control on the currency field on the sales order screen.
Sage X3 is a true multi-currency software that comes configured with most currencies out of the box. Without deleting currencies one by one, you can still control which values can be used within a particular currency field.
In our scenario, because you do not deal with Canadian dollars or Hong Kong dollars, you can restrict the values allowed in a currency field by selecting the below information:

A few things to note on this screen:
- You can configure three controls for the same fields. They will be evaluated in sequence from tab Control 1 to tab Control 3.
- You can add a control as to whether a field is mandatory and the condition for it.
- You can make the control either available on entry, upon import, or both.
- The different control types are as follows:
- Mandatory value: only one of the values defined in the control table is authorized.
- Prohibited value: all values are authorized, except the values listed in the control table.
- Range of values: the authorized values are defined within a range.
- Table reference: the value must correspond to a principal key value in a table defined elsewhere.
- Expression: a logical expression built with the formula wizard that must be verified by a control value.
- At the bottom of the screen, you enter the message that will be displayed if the condition is met.
You could just have as easily decided to use the mandatory values if my scenario was to only be able to choose CAD and HKD as the currencies available.
Using the range of values option, if you create a numeric field where the field is allowing to enter a 4-digit number, you can also decide to let the user only enter a range from 1 to 5150 instead of allowing all numbers from 1 to 9999.
What’s left is assigning the control code we just created to the field where want that control to happen.
This will require that you know which screen and field you want to assign this control to. (As a reminder, you can figure out the screen code and the name of the field by placing your cursor in the field and holding down ESC while pressing F6.)
Here is the screenshot of that shortcut on the currency field of the sales order.
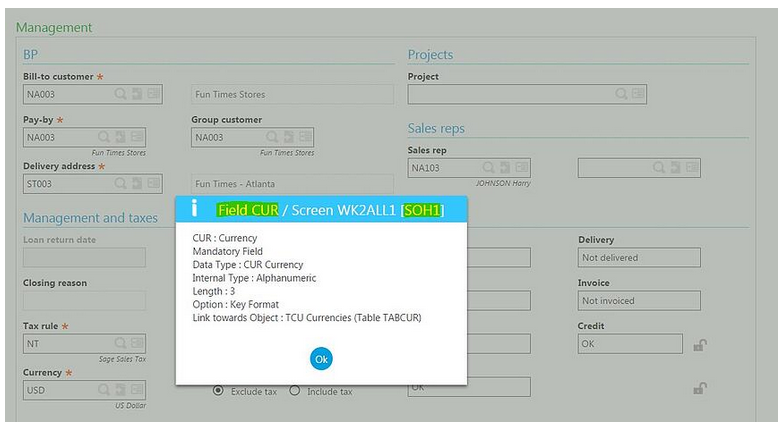
Remember to always use the field code as highlighted and the screen code in the square brackets, not the one starting with a W.
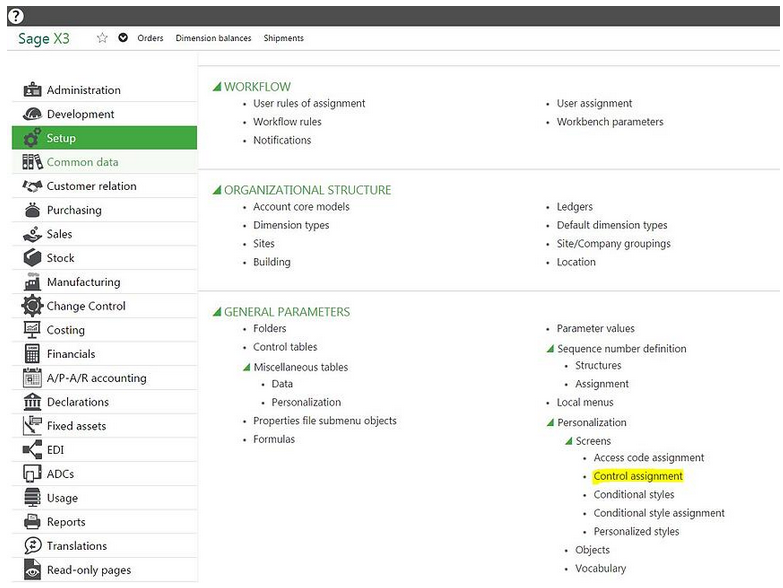
To make the association between the control that you just created and the field on the screen, there’s a dedicated function called control assignment:
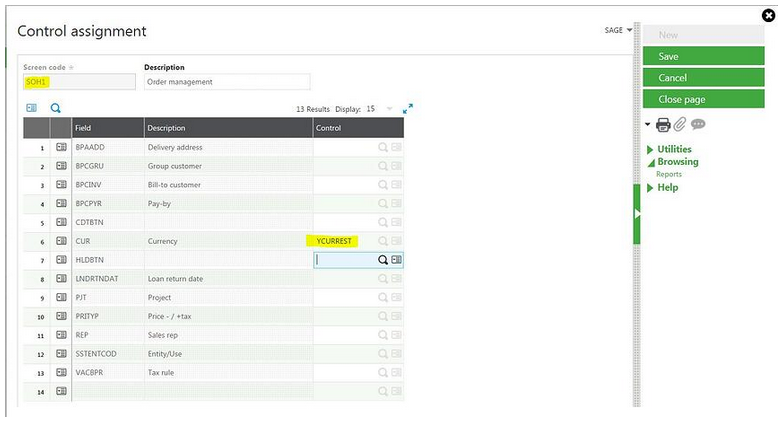
You can then plug in the values we wrote down when we viewed the technical data of the field as follows:
Because the sales order is an entry transaction driven screen, after you save the above, you’ll have to validate the entry transactions you use in your system.
Let’s assume you’re only using the ALL entry transaction. You need to go to Setup > Sales > Entry transactions > Orders and then validate the ALL entry transaction.
Now, if you go to the sales order and enter the CAD currency, you should get a blocking control that prevents you from selecting it and giving you an error message when you try.
These are only a few examples of how you can use this functionality to add controls to your fields in Sage X3.
Please contact us if you have questions or need additional pointers to add controls to your field!