
Sage 100 Newsletter – Q1 2025
Keeping You Up-To-Date With Information About Sage 100
How to Create a New User In Sage 100 – Part 2
By: Jane Amorim, Business Analyst / Consultant
Part 2: Creating User Roles
In the previous newsletter, we covered the basics of creating a user account and assigning existing roles to it. This is part two of two, which walks you through creating a security role.
The Basics of Roles in Sage 100
A role is assigned to users and is a collection of permissions that determine what a user can do in Sage 100. By assigning a role or roles to users, you can streamline the process of managing permissions, especially as your user base expands.
Steps to Create a Role:
-
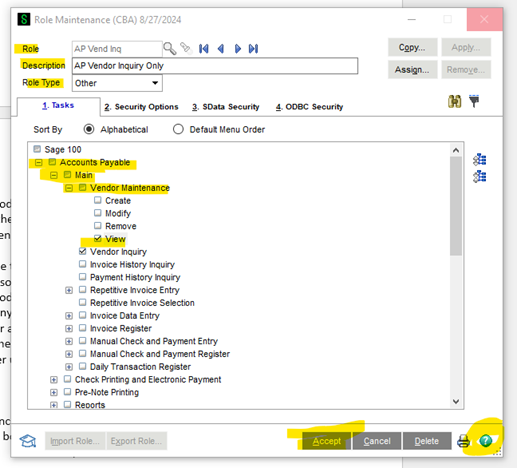
- Access the Role Maintenance Screen
- Navigate to the “Library Master” module.
- Expand the “Security” menu and click “Role Maintenance.”

- Create a New Role
- In the Role Maintenance window, type in a new role name next to “Role.”
- If the role name you entered already exists, it will be displayed on the screen for reviewing/editing.
- Use the magnifying glass to see which roles already exist. You may want to follow their naming conventions, such as the module code followed by a short description.
- Fill in the required fields “Description” and “Role Type.”
- Define Role Permissions
- On the “1. Tasks” tab, check or uncheck permissions for various tasks within each module. For example, you might allow the role to view vendors in Vendor Maintenance, but not create them.
- Use the “Security Options” tab to manage access to sensitive actions, such as allowing access to private batches, overriding system warnings, etc. Use the help [?] button at the bottom right corner of the screen to learn more.
- Access the Role Maintenance Screen
- Assign the Role to Users
- Once the role is configured, you can assign it to users using the “User Maintenance” menu option. See Part 1 for more information.
- Save the Role
- Click “Accept” to save the role configuration.