Net at Work is hiring!
Grow your career with us.   Apply Now X
Need Help?
  • Application Remote Support
  • Infrastructure Remote Support
  • Sage HRMS Remote Support
  • Helpdesk
  • General Inquiry
1-800-719-3307
Net at Work Net at Work
  • Solutions & Services
    • ERP/Accounting
      Software & Vendor Selection
      ERP Implementation Services
      ERP Migration Services
      Acumatica
      NetSuite
      Sage X3
      Sage Intacct
      SDMO
      Sage 100 ERP
      Sage 300 ERP
      Sage 500 ERP
      CRM
      Strategic Advisory Services
      CRM Training Camp
      Creatio
      Sage CRM
      Employee Experience
      Sage HRMS
      Rippling
      Workforce Go
      Criterion
      Miviva
      Enterprise Content Management
      Imaging / Scanning
      Document Management
      Workflow Automation
      Solutions
      Nonprofit Solutions
      Abila by Community Brands
      NetSuite
      Sage
      Salesforce
      IT and Security Services
      Managed IT Services
      Fractional CIO Services
      Cloud Services
      Cloud at Work Sage Hosting
      DR/Business Continuity Planning
      Compliance & Security
      Storage & Recovery
      Networking
      IT Security Services
      Communications
      Web Solutions
      Services Overview
      B2B Technology Suite
      Magento eCommerce
      WordPress CMS
      Systems Integration
      Website Managed Services
      Online Marketing & SEO
      ERP eCommerce Integration
      Additional Solutions
      Enterprise Business Intelligence
      Avalara Automated Tax Solutions
      Fortis Payments
      Sage Fixed Assets
      Vertex SMB Sales and Use Tax
      Prime Foodservice Software
      Rental 360
  • Industries
    • Industries
      Chemicals
      Construction
      Discrete Manufacturing
      Field Service
      Food & Beverage
      Healthcare
      Industrial Manufacturing & Equipment
      Medical Devices
      Nonprofit
      Private Equity
      Retail
      Wholesale Distribution
  • Learning Center
    • Online Resources
      Recorded Webinars
      Whitepapers
      Ebooks
      Success Stories
      Upcoming Events
      Live Webinars
      Seminars
      Virtual Training Courses
      Training Courses
      View all available training course options
  • Company
    • Why Us
      Who We Are
      Management
      Our Partners
      Locations
      Careers
      News
      Press Releases
      Success Stories
      Net at Work Blog
      Contact Us
      1.800.719.3307
      Email Us
      Programs
      Alliance Partnership Program
      Women at Work
      Diversity and Inclusion
  • Blog
  • Contact Us
  • Contact Us

Home » Newsletters » Sage 300 Newsletter – October 2016 » Sage 300 Tips & Tricks

Sage 300

Sage 300 Newsletter – October 2016

Keeping You Up-To-Date With Information About Sage 300

Sage 300 Tips & Tricks

By: Net at Work Team

Did you know that the Finder in Sage 300 can be customized to fit your specific needs for lookup? The finder is saved by user for the classic desktop screens and is only for the specific screen and field that you are customizing. It remembers settings by screen by user. This article will address how to customize your finder with the find by, global settings, adding and arranging the columns to the finder, and setting criteria (parameters) for the finder.

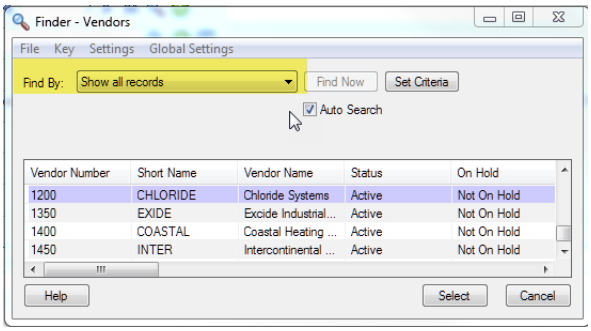
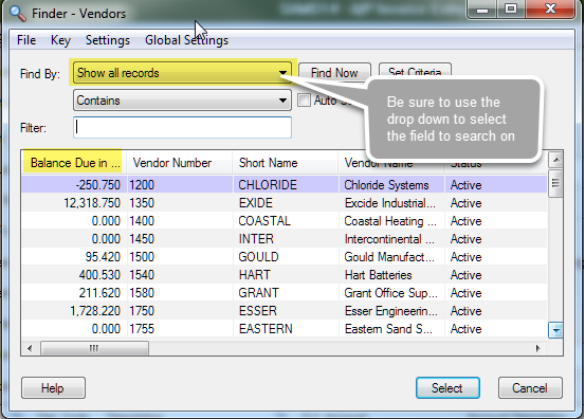
In our examples, let us use the Finder in the Vendor Number field when entering an invoice as an example. If you have not yet used the Finder on the screen where you are looking up a Vendor Number, you will be presented with a Find By: Show all records drop down box when you click on the Magnifying Glass:

s100-tips-tricks-oct16-5-33-18-pm

By clicking on the drop-down arrow you will see all of the default columns that can be used for locating a vendor.

s100-tips-tricks-oct16-5-33-24-pm

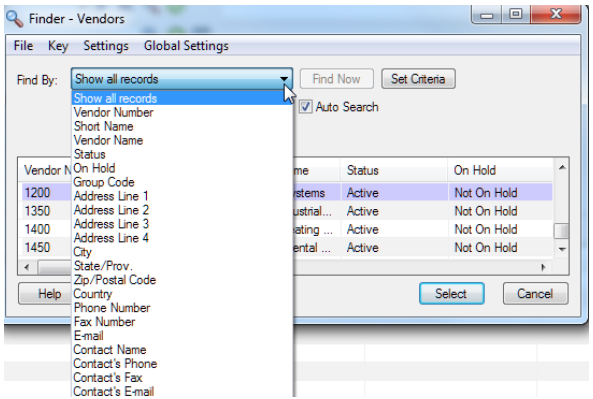
From here you can select the Vendor Name or Vendor Number or another field that would assist you in locating the vendor. For this example, we are going to select the Vendor Name.

s100-tips-tricks-oct16-5-33-31-pm

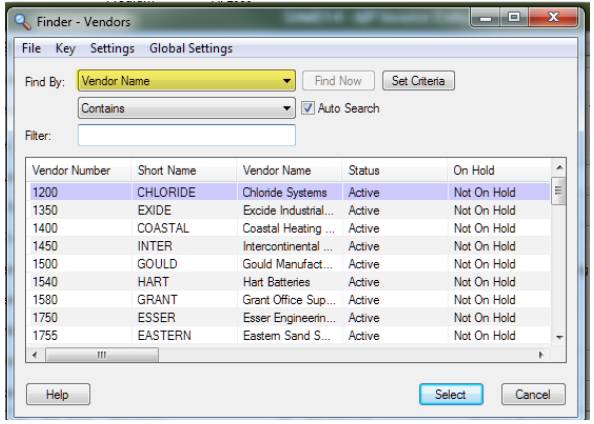
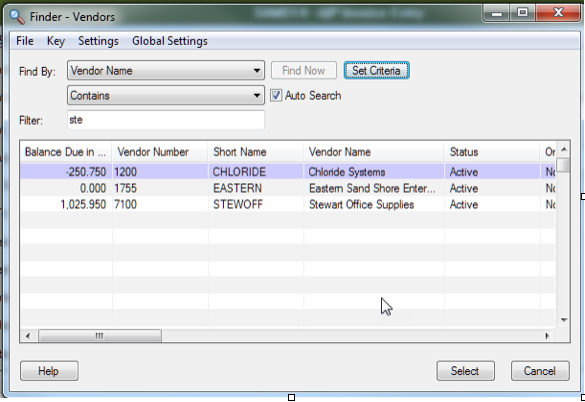
After selecting Vendor Name the next option is to choose whether to use Contains or Starts with with regard to how you want to search. In this example, we have selected Contains in order to give us more options for looking up the vendor.

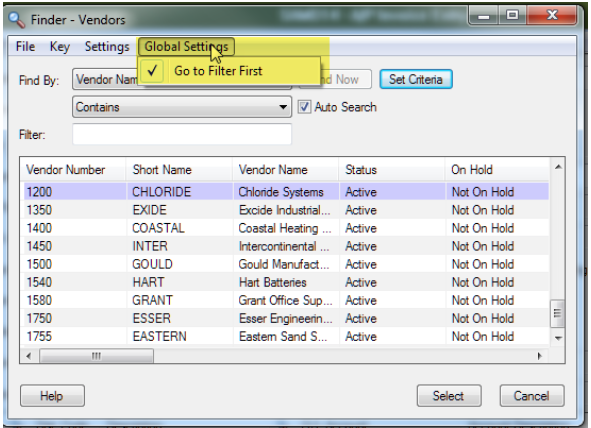
Now we can type part of the vendor name in the Filter Field. You will notice that you have to click in the Filter field in order to type. If you would prefer to have the cursor go to the Filter field automatically, select Global Settings from the menu above.

s100-tips-tricks-oct16-5-33-36-pm

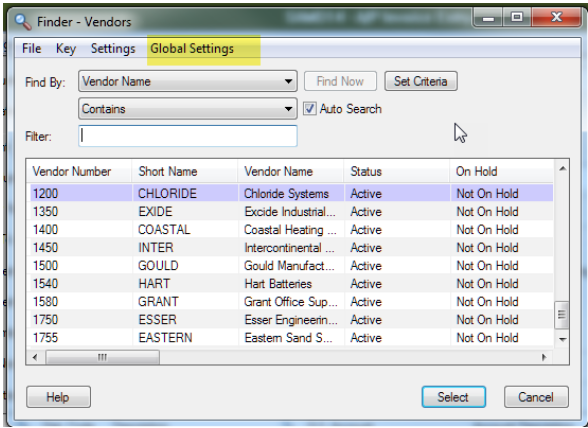
Select Go to Filter First. This will be set globally throughout all of the finders for you as a user for the company you are in. This is just a nice little tip to save a bit of time when searching.

s100-tips-tricks-oct16-5-33-43-pm
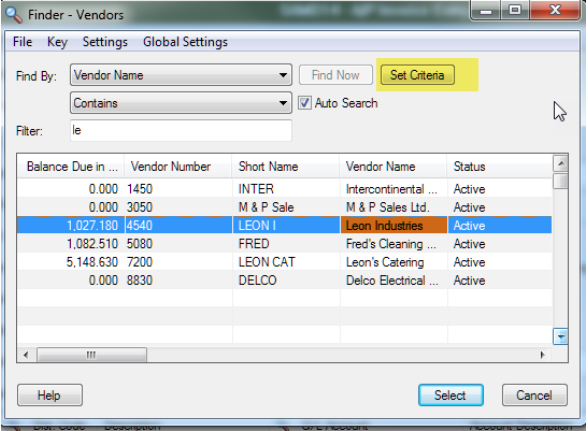
Now back to finding the vendor for the invoice we are entering. My vendor name on the invoice is Leon Industries so I am going to type Le in the filter. You will notice as you start typing that the Auto Search immediately starts working. You can continue to type more letters to locate the EXACT vendor or select it from the list presented.

If you do NOT have Auto Search checked, you will notice that the Find Now option is available for you to select. Typically, the Auto Search is turned on but if you notice that your system is taking a long time to locate what you are looking for, you may want to uncheck it and use the Find Now to speed up the process.

s100-tips-tricks-oct16-5-33-48-pm
Whether you are using the Auto Search or not, you will then be able to locate the vendor you need.

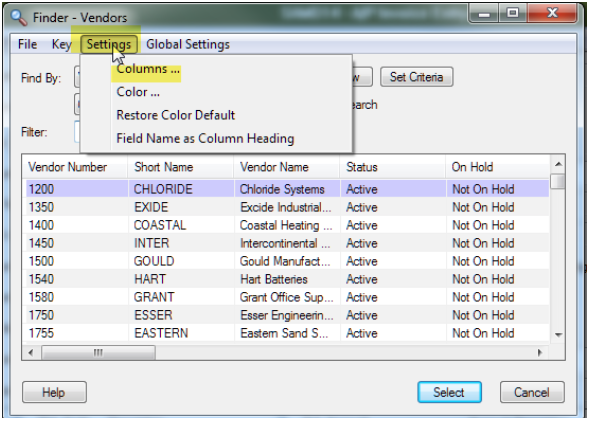
There are other features of the Finder that may be of use to you. The first one is under Settings on the menu bar. From here, select Columns.

s100-tips-tricks-oct16-5-33-54-pm

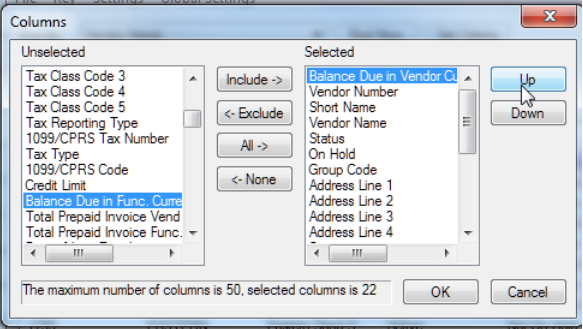
You will see that you are presented with a list of both Unselected and Selected fields that are available for lookup. You can Include, Exclude and/or move the columns around in order to accommodate your preferences. For example, I want to see the outstanding balance we have for the vendor I am looking up. To do this, I will scroll down on the Unselected side until I locate Balance Due in Vendor Currency.

s100-tips-tricks-oct16-5-33-58-pm

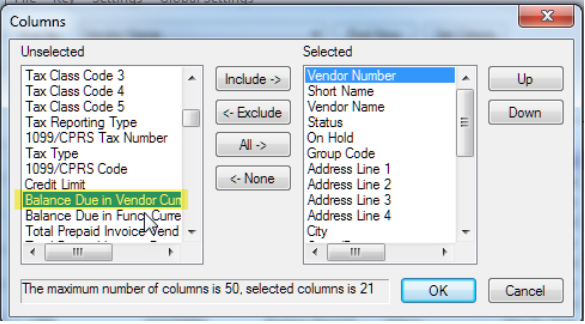
From here, I can double-click my mouse to move it to the Selected side or select Include from the button in the middle of the screen. Now what I would like to do is have that field more visible when I use the Finder so I am going to use the slider bar on the Selected side and go to the bottom of the list.

s100-tips-tricks-oct16-5-34-02-pm

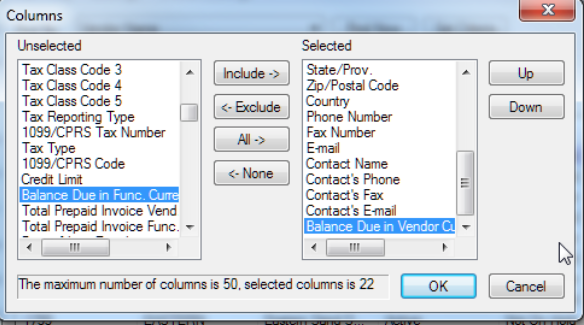
From here, I am going to click on the Up button on the right-hand side of the screen to move the field closer to the top of my selected fields.

s100-tips-tricks-oct16-5-34-07-pm

Click OK. You will now see the Balance Due column. You will also notice that the Find By: field changes back to Show all records. Be sure to click on the down arrow and select the field you would like to use for locating the vendor (in this example).

s100-tips-tricks-oct16-5-34-12-pm

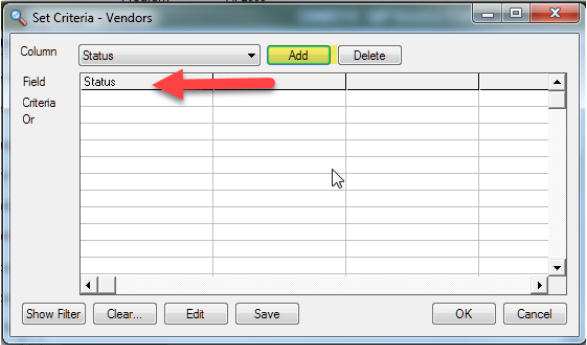
The last tip for using the Finder is how you can use the Set Criteria option to locate specific information. In this example, I only want to find vendors with an Active Status. Click on the Set Criteria button.

s100-tips-tricks-oct16-5-34-18-pm

You will see a new screen per below:

s100-tips-tricks-oct16-5-34-23-pm

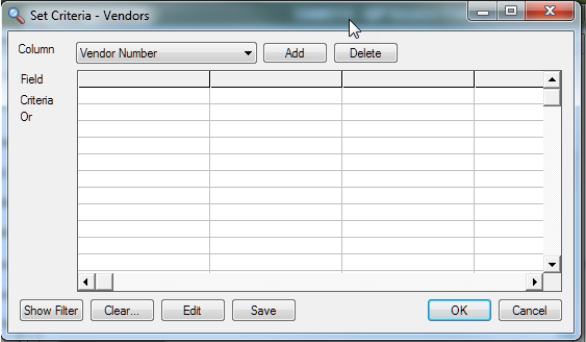
From the Column drop-down, Select Status. In order to add it to the Criteria, click Add. This will add the Status column to the Field cell.

s100-tips-tricks-oct16-5-34-28-pm

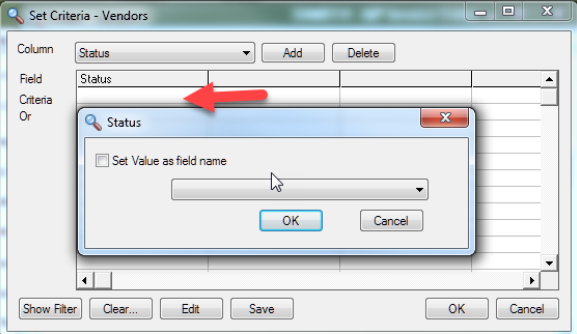
In order to set the Criteria to Active, double-click in the cell below Status and to the right of Criteria

s100-tips-tricks-oct16-5-34-32-pm

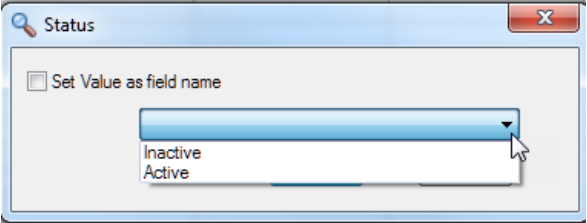
Click on the drop-down arrow to view the options available. In this case you will see both Inactive and Active options.

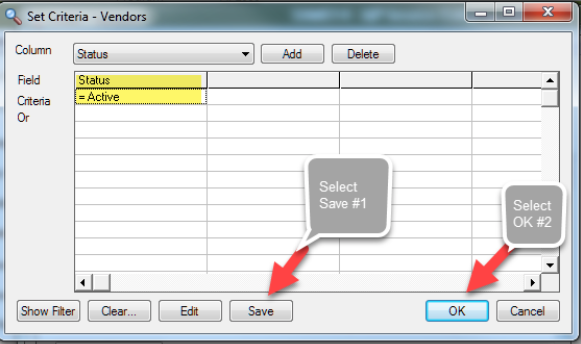
Select Active, Click Save and then Click OK.

s100-tips-tricks-oct16-5-34-42-pm

Prior to setting the criteria, my sample data reflected Stewart Or and Associates.

s100-tips-tricks-oct16-5-34-46-pm

After setting the criteria to reflect Active Vendors only, Stewart Or and Associates is not in the list.

s100-tips-tricks-oct16-5-34-52-pm

These are just a few of the tips and tricks we have for using the Finder in Sage 300. There are some limitations with finders so as you work with Sage 300 in your environment and try a few of these, do not hesitate to contact us should you have any questions or need assistance with this feature or any others!

« Return to Newsletter
  • This field is for validation purposes and should be left unchanged.
In This Issue
  • From the Desk of the Sage 300 Practice Director
  • Government Compliance Notification: Sage 300 U.S. Payroll Tax Updates are Available
  • Sage 300 Integration Forms and Source Interfaces
  • Sage 300 Tips & Tricks
  • Sage 300 Support

    Helpdesk:
    P: 888.494.9479
    E: helpdesk@netatwork.com

    Upcoming Live Webinars

    Sage 300 Virtual Educational Courses – See Dates/Times

    Supercharge Sage 300 with Fortis Payments
    October 8 | 2pm ET
    Register Here

    Year End CRM Evaluation: 2025 Platform Comparison Guide
    October 8 | 2pm ET
    Register Here

    Stop Microsoft 365 Attacks Before They Hit
    October 14 | 2pm ET
    Register Here

    Popular Recorded Webinars

    The Case for Hosting Sage 300 in the Cloud

    Sage 300 & Finance Leadership in Action: Outpace the Competition for Top Talent

    Extend the Power of Sage 300 with Seamless eCommerce Integration

    Sage + DocLink – Document Management, Less Paper, and Smarter Workflow

    Sage 300 Webinar Archive

    View our library of on-demand recorded webinars.

    Newsletter Archive

    Read our previous Sage 300 Newsletters here

    Connect With Us

    Business Applications

    • Overview
    • Software & Vendor Selection
    • ERP Implementation Services
    • ERP Migration Services
    • Cloud ERP
    • CRM
    • Employee Experience
    • ECM
    • Nonprofit Solutions

    Learning Center

    • White Papers & Guides
    • Ebooks
    • Training Courses
    • Virtual Training Courses
    • Success Stories
    • Live Webinars
    • Recorded Webinars
    • Trials

    Infrastructure Solutions

    • Managed IT Services
    • Fractional CIO & Advisory Services
    • Cloud Services
    • Cloud at Work Sage Hosting

    Support

    • Application Remote Support
    • Infrastructure Remote Support
    • Sage HRMS Remote Support
    • General Inquiry
    • Helpdesk

    Web Development

    • Services Overview
    • Magento eCommerce
    • WordPress CMS
    • Systems Integration
    • Website Managed Services
    • ERP eCommerce Integration

    Company Information

    • Why Us
    • Alliance Partnership Program
    • Women at Work
    • Diversity and Inclusion
    • Partners
    • Careers
    • News
    • Blog
    • Privacy Policy
    • Contact Us

    Additional Solutions

    • Enterprise Business Intelligence
    • Avalara Automated Tax Solutions
    • Fortis Payments
    • LeaseQuery Lease Accounting
    • Sage Fixed Assets (Sage FAS)
    • Vertex SMB Sales and Use Tax
    • Prime Foodservice Software
    • Rental 360
    • SDMO

    Industries

    • Chemicals
    • Construction
    • Discrete Manufacturing
    • Field Service
    • Food & Beverage
    • Healthcare
    • Industrial Manufacturing & Equipment
    • Medical Devices
    • Nonprofit
    • Private Equity
    • Wholesale Distribution
    Net at Work
    Net at Work (HQ)
    575 8th Ave
    New York, NY 10018

    P: (800) 719-3307
    info@netatwork.com
    Locations Across North America »
    Visit our sister companies:
    Cloud at Work - Sage Application Hosting
    Pixafy - An eCommerce Agency
    Docutrend
    WordPress Image Lightbox Plugin


    Our website uses cookies to ensure you get the best experience. Learn more.

    I Understand