 Customize Your View: How to Add Header Fields to your Left List in Sage X3
Customizing the left list in Sage X3 is a simple way to make your workspace work better for you. By adding the fields that matter most to your daily tasks, whether you are managing orders, invoices, or inventory, you can quickly see the information you need without extra clicks or searches.
Here are seven great reasons to enhance your left list with header fields.
🔍 1. Faster Filtering and Navigation
Quickly narrow down records without opening full search dialogs. This reduces time spent scrolling or manually searching through large datasets.
🎯 2. Improved Data Visibility
Display key fields such as status, customer name, site, or date for instant context. This helps users identify relevant records at a glance.
🧠 3. Supports Role Specific Workflows
Finance, logistics, and sales teams can each tailor their view to highlight what is most relevant to their daily tasks.
📊 4. Better Decision Making
Having filterable fields such as “Order Status” or “Priority” visible helps users act more quickly and with greater accuracy.
🛠️ 5. Reduces Errors
Easier filtering reduces the chance of selecting or editing the wrong record. This is especially valuable in high volume environments like order entry or inventory management.
📈 6. Boosts Productivity
Streamline repetitive tasks such as checking open orders, pending invoices, or stock levels. Fewer clicks mean more time for higher value work.
🧩 7. Supports Custom Business Logic
If your organization uses custom fields such as region codes or internal flags, adding them to the left list makes them visible and actionable. This enhances the value of your existing Sage X3 customizations.
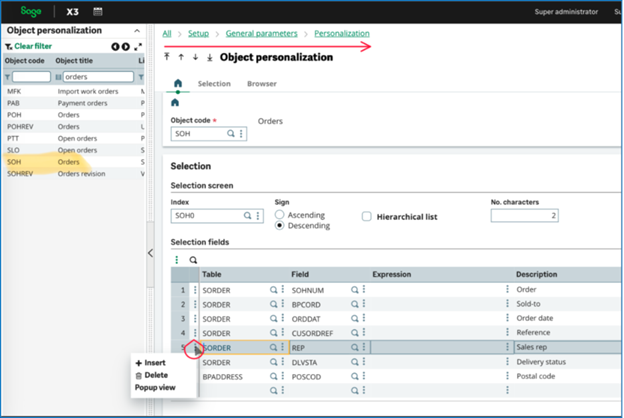
Adding Header Fields to the Left List
To make this customization, follow these simple steps:
- Go to Setup > General Parameters > Personalization > Objects
- Find the object for the document type you want to modify
- Select the Action button on a line and choose Insert
- Add the field you want to appear on the left list
- Click Save (no validation needed)
We hope you enjoyed this week’s X3 Insider Tips & Tricks blog. More helpful insights are on the way, so be sure to keep an eye out for future editions. In the meantime, if you have any questions about getting the most from your Sage X3 system, don’t hesitate to reach out. The friendly experts at Net at Work are always here to help.