 Sage X3 Tips and Tricks: Making the Bank Field Mandatory in Payment Entry
When processing payments in Sage X3, maintaining accurate and complete data is essential. Even one small oversight, such as leaving the Bank field blank, can lead to incomplete records, reconciliation challenges, or reporting discrepancies later on. Fortunately, Sage X3 allows you to define which fields are required, ensuring that important details are captured before posting any transaction.
In this week’s tip, we will show you how to make the Bank and Check Number fields mandatory during payment entry. This small change helps prevent errors and improves data consistency across all payment transactions.
Step 1: Open the Payment Entry Transaction Setup
From the main menu, navigate to Setup → A/P–A/R Accounting → Payment Entry
Transactions.
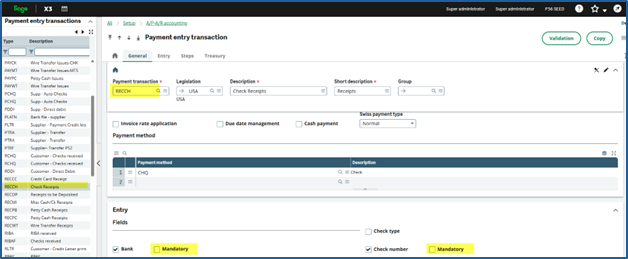
This screen displays a list of payment entry transaction types such as RECCH and PAYWT. Each transaction type determines which fields must be completed before a payment can be saved or posted.
Screenshot example:
You will notice that “Bank” and “Check Number” are not selected as “Mandatory”.
Step 2: Make the Bank and Check Number Fields Mandatory
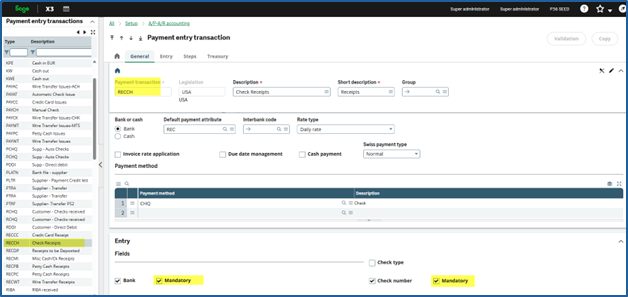
- Select the transaction typeRECCH (Check Receipts).
- In the list of fields, locateBank and Check Number.
- Check the boxes in the Mandatory column next to each field.
- Click Save, then select Validate to confirm the changes.
Screenshot example:
After saving, you should now see checkmarks in the Mandatory column for both Bank and Check Number on the RECCH line.
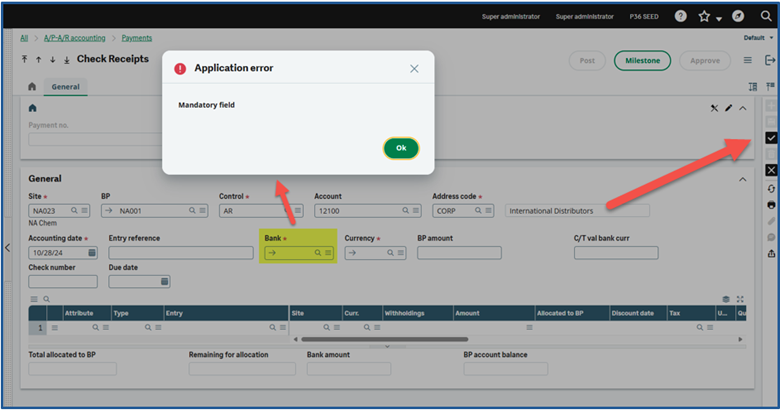
Step 3: Test the Change in Payment Entry
Open the Check Receipts (RECCH) screen and begin entering a new transaction. When you attempt to save the record, you can see in the image below that Sage X3 will now require both the Bank Code and Check Number to be entered before you can continue.
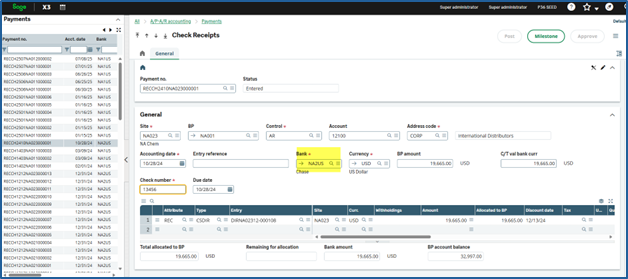
Once you complete these fields, select Open Invoices from the left list, and then click the check mark on the right side of your screen to “Create”. Now you can proceed with your normal process to post the check receipts, either from the Payment screen or through Bank Deposits.
Screenshot example:
This image shows the end result: A completed entry with both required fields filled in and now ready for posting.
Step 4: Explore Other Fields You Can Make Mandatory
If you would like to enhance data accuracy even further, return to the Payment Entry Transaction setup screen. Review the full list of configurable fields available for each transaction type and decide which ones should be mandatory based on your business requirements.
This flexibility allows you to tailor Sage X3 to your organization’s internal control policies and data entry standards.
Key Takeaway
Defining mandatory fields in Sage X3 is a simple but powerful way to improve accuracy, prevent incomplete data, and strengthen internal controls. By requiring users to enter information such as Bank and Check Number before posting, you can ensure that every transaction meets your company’s financial and audit standards.
Closing Statement
Have a question about this tip or need help configuring Sage X3 for your business? Our Sage X3 experts are here to help. Contact us today to learn more.