ACH Set-up and Processing with Sage X3
ACH processing and adoption is quickly becoming more and more prevalent in today’s business climate – ACH is a perfect AP option for remote work forces. Sage X3 can be setup to process ACH payments easily and efficiently. In order to use ACH processing with Sage X3, we’ll first focus on the setups (Steps 1 thru 6). Below we reference different ‘functions’ (aka. ‘screens’) that require configuration*
*Please note that in all of the following screenshots, we bring attention to the function’s “breadcrumb” by encasing it in a red box. This will be important as it points you to the location/navigation of where a user can find the specific function that is being referenced.
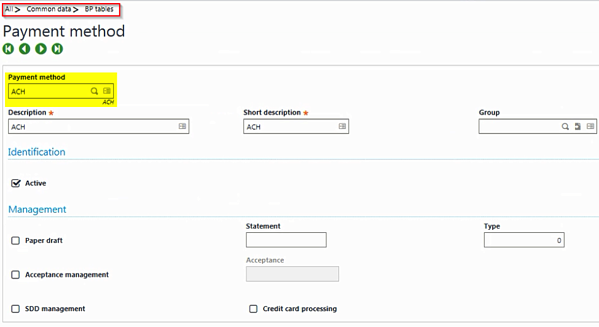
1. Payment Method function – Creating a new “ACH” Payment Method is required for running Sage X3’s Payment Proposal (aka. payment batches) and provides an Accounts Payable Clerk/Manager enhanced flexibility in deciding whether or not to process ACH payments along with or completely separate from other vendor payments types (i.e. physical checks, wire transfers, etc.)
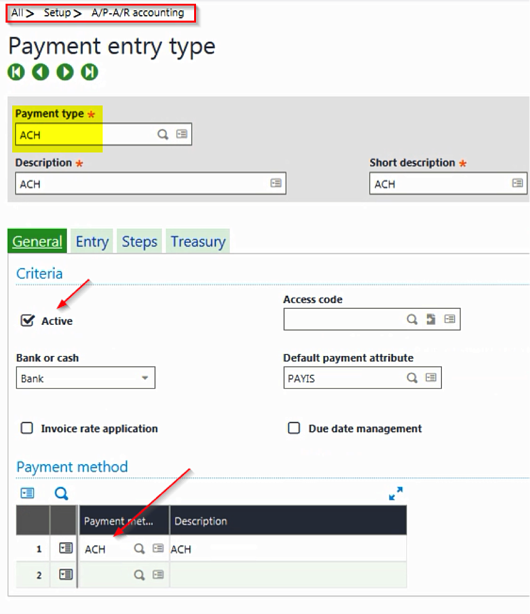
2. Payment Entry Types function – Sage X3 has many out-of-the-box entry types, but for purposes of ACH processing, we’ll go ahead and create a brand new one, this way we can keep ACH processing completely separate from other vendor payment types.
- General tab – Make sure that the “Active” checkbox is ‘ticked’ and that the Payment Method referenced is “ACH” only
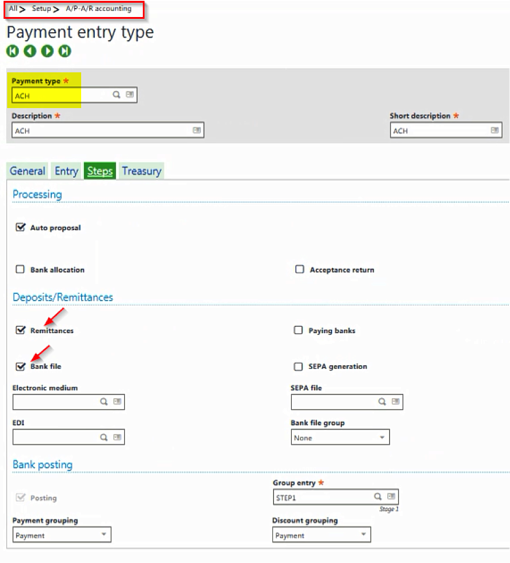
- Steps tab – Make sure that the “Remittances” and the “Bank File” checkboxes are ‘ticked’, which will allow for the grouping of multiple vendor payments onto one Sage X3 transaction (aka. the Remittance) and will allow for a corresponding ACH file to be generated.
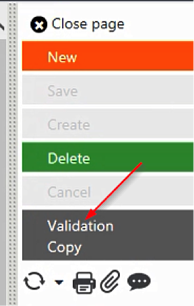
- Validate ‘right-list’ option – Just as is the case with all other Entry Transactions within Sage X3, any changes need to be “Validated”, so that the next time a user attempts to process a payment transaction w/ the “ACH” Payment Type all of the changes made are made available for future processing.
3. Bank Account function – An organization may make payments from different banks, so we’ll also need to update the bank setup as well to establish which of them can and cannot process ACH payments
- General tab – Information from the Identity section can be used throughout the ACH file (i.e. File/Batch Header rows), so it is of crucial importance that this be filled out correctly.
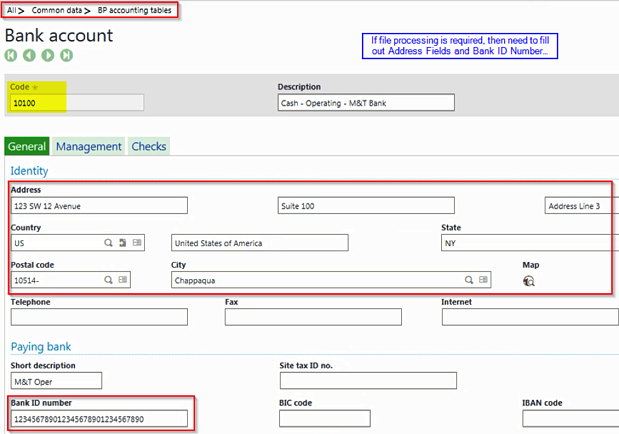
- Management tab – Usually the File Extension is “txt”, but this may change depending on the requirements of the banking institution. Additionally, it may or may not be required to ‘tick’ the “Additional Record” or “Processing by Batch” checkboxes.

4. Bank File Definition function – Please note that the below is an example of an ACH template. Each bank’s ACH file respects NACHA formatting, but each bank has their own little nuances (i.e. check digit(s), etc.) and as such, will provide their documentation on what template is required

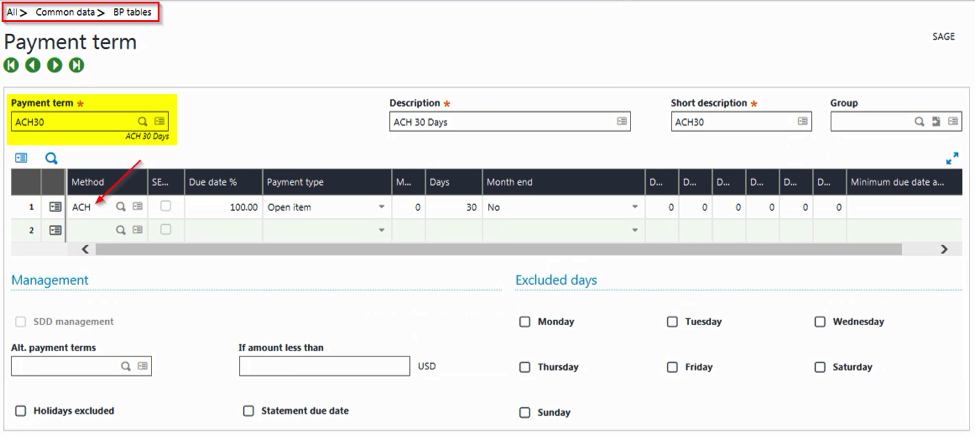
5. Payment Term function – In order to establish the link between supplier and payment type a whole new ACH-related Payment Term (or set of them depending on how many payment terms are actually required).
6. Suppliers function – Each supplier that has accepted ACH processing/payments will require additional setups.
- Financial tab – The Payment Term field will need to reference one that has a Payment Method of “ACH” associated with it. Please refer to prior step.
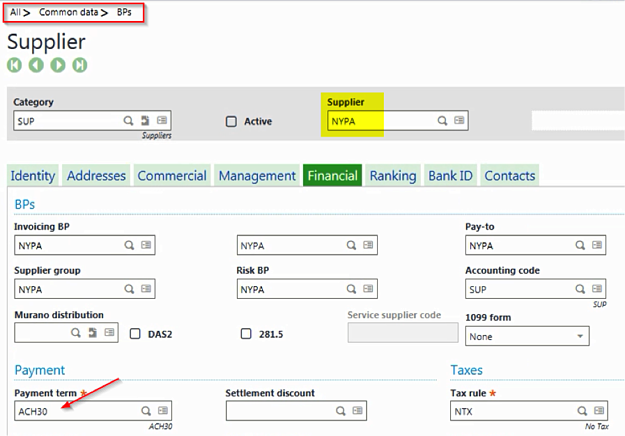
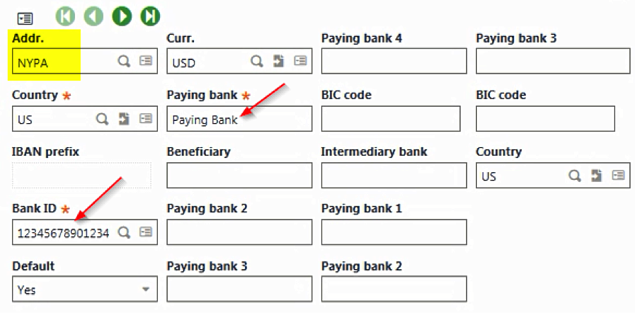
- Bank ID tab – this is where the supplier’s bank account and routing number are entered.
At this point, the setups required for ACH processing are complete. The next set of screenshots (Steps 7 thru 10) goes through an example of processing a transaction from invoice-to-payment proposal-to-ACH file generation. Please note that if you are familiar w/ Sage EM that they are pretty self-explanatory.
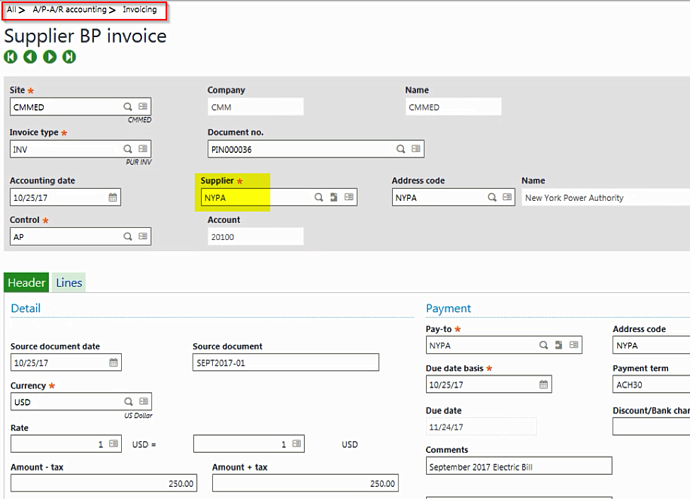
7. BP Supplier Invoice function – A simple example for purposes of this blog post
- Header tab – Note that we are referencing the supplier from Step 6 and because of this the Payment Term has defaulted to the “ACH30”, which is tied to the “ACH” Payment Method.
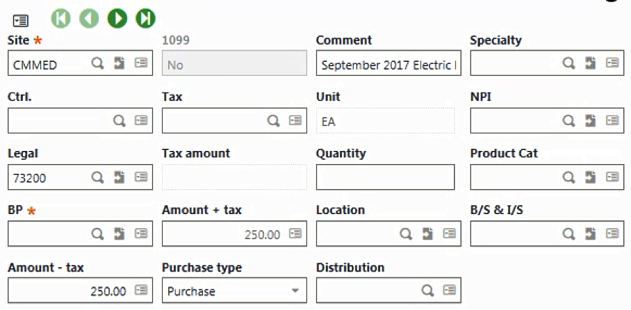
- Lines tab – just for information purposes, as a ‘one-line’ invoice was entered.
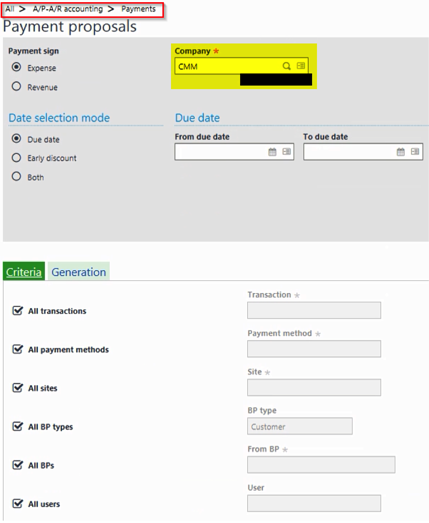
8. Payment Proposal function – There are processed by individual company and in order to process payments (as opposed to receipts) the Payment Sign will need to be “Expense”.
- Criteria tab – Even though the Payment Method field has been left ‘blank’, the payment proposal can be processed so that only transactions that are linked/tied/assigned to the “ACH” Payment Method can be included.
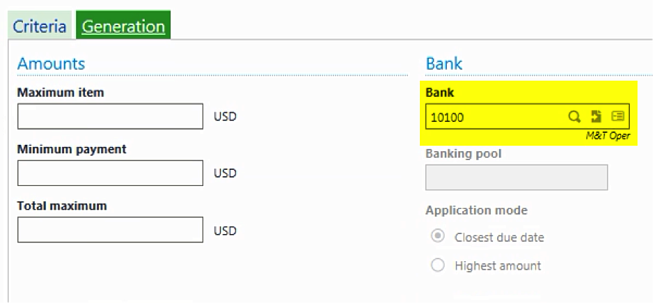
- Generation tab – The only mandatory field on this tab is the Bank field.
- Results pop-up – Please note that the Payment Proposal will attempt to create 9 payments, one of which references the invoice entered in Step 7.
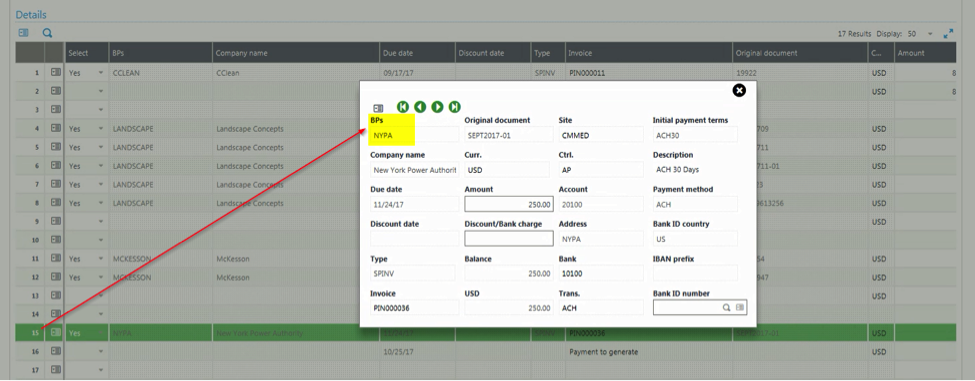
- Log pop-up – Provides a summary of what payments/receipts were generated. Please note that the previous Payment Proposal screen was adjusted, so that only one payment was generated (the one paying the invoice from Step 7)

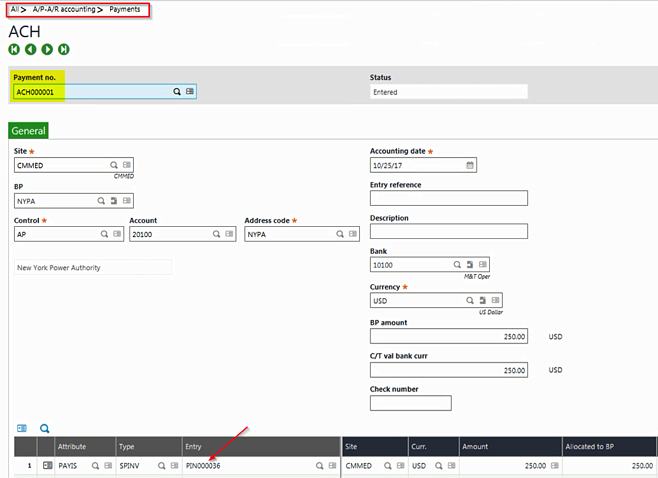
9. Payment/Receipt Entry function – Referring back to the Log file from Step 8, we’ll note that an “ACH” payment was generated.
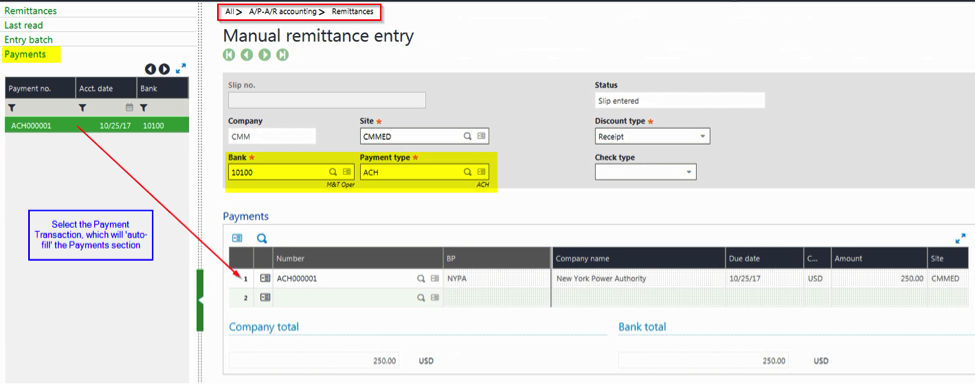
10. Remittance function – Multiple payments (or one) can be included on a remittance.
- Create New Remittance – Assign the Site, Bank and Payment Type to “filter” the Payments ‘bucket’ found on the ‘left-list’. From there, select all of the payments (generated in Step 8) that we’ll want on the remittance.
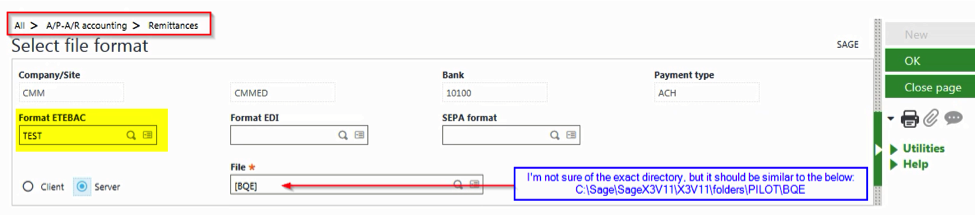
- Generate the Bank File – Use the Bank File to generate an ACH file. The layout of which will be what was defined in Step 4.

- Select File Format pop-up – If not defined, this pop-up will appear and will request the ‘windows folder’ where the ACH file will need to be exported to.
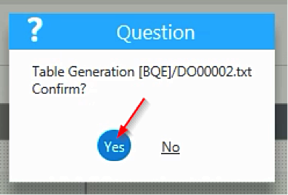
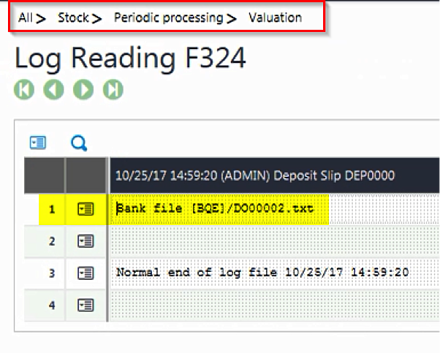
- Confirmation pop-up – ‘Click’ on “Yes” and review subsequent Log File pop-up.
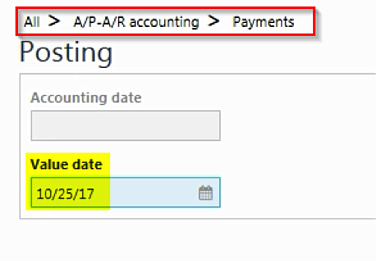
- Post – Found on the ‘right-list’ of the Remittance screen.

- Posting pop-up – Enter a Value Date (will default to current processing date)
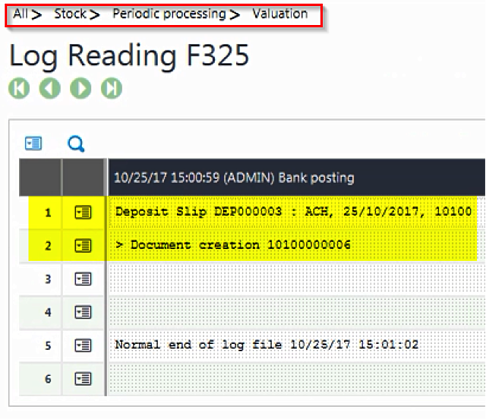
- Log File pop-up – Provides a summary of the Accounting Documents that will be generated.
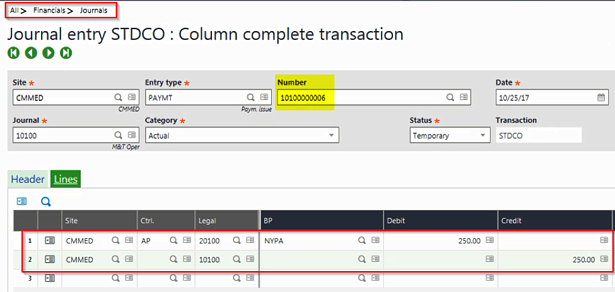
- Journal Entry function – Review to ensure accuracy.
If you have any questions regarding the setup and processing of an ACH transaction, please contact us.